Monday, 14 August 2017

HOW TO AIRTEL ACTIVATE DOUBLE MB DATA OFFER


Airtel Nigeria as we know is one the best network for data plans in Nigeria, now they are here again with the double data offer that will be lasting for months.
If you are a heavy data user or you like downloading or surfing, and streaming videos on youtube using your smartphones or your computer, this offer is just right for you. Its an upgrade to the airtel default data plans whereby the data size has been doubled.

See also: The Complete Airtel Data Plan and Dial Codes 2017.
For instance, with 500 naira you can get 1.5GB of data which has a duration of one week, 1000 naira for 3GB instead of the usual 1.5GB for one month and many more which you will see the activation codes in this post, also the good thing about this offer is that you dont need to migrate to a special tariff plan to enjoy it.

Note: This offer does not work on all sim card or subscribers, but you can check if it will work for you.

To activate this offer, simply dial *144#, you will see the available options as shown in the screenshot below.

After that select anyone of them,  After your selection you will receive an sms confirming the activation as shown in the screenshot below.
If you want to check the remaining data just dial *140# then you will receive a message containing the remaining data.

How to activate Airtel mb
 Airtel #100 for 50MB+50mb plan and dial code in *410# 1day

Airtel N200 for 200MB+200mb data plan and Dial Code *412# With this plan you will be able to enjoy 3 full days.

Airtel N100 for 25MB 5-days data plan and dial codeEnjoy 5 days of surfing the net and social networking for just 100 naira only. The plan allows one to browse the internet with a 5MB daily usage and is good for mostly feature phones not smartphones.Price: N100Validity: 5-daysDial code : *401#Max-data.

AIRTEL MB N300 for 350MB+350mb Weekly planBrowse the web and socialize with just N300 for 350MB with a duration of 7 complete days. How long the data will last depends on the kind of phone its being used and what you are doing with it.Price: N300Validity: 7-daysDial code dial *417# to activate.

AIRTEL Mb N500 for 750MB+750mb 2-week data planWith just 500 naira you will enjoy 750MB of data for two weeks. This plan can be used on your smartphones and laptops.Price: N500Validity: 14-days Dial code *418# to activate.

Airtel mb N1000 for 1.5GB+1.5gb data plan – Android 1.0Enjoy a full month of browsing, with just 1000 Naira you will get 1.5GB of data. This plan works on android, iphone and laptops by tethering or using a usb modem.Price: N1000Validity: 1-MonthDial code : *496# to activate

Airtel N2000 for 3.5GB+3.5gb data plan – Android 2.0This plan gives you 3.5 of data for browsing and surfing the net with just 2000 naira.Price: N2000Validity: 1-MonthDial code : *437#.


HOW TO ACTIVATE AIRTEL SOCIAL BUNDLE


How to buy social bundle on airtel NIGERIA 
Simply dial *688# after choose one you want.

1 unlimited ₦300 as 1024mb 25days
2 unlimited ₦200 as 200mb 25days 

This is a 3 in 1 bundle it will help you to enjoy
Facebook
Whatsapp
Opera mini

Tuesday, 8 August 2017

HOW TO USE MOUSE


Plug in the mouse with its USB connector.Your mouse will have a cable extending from it, or it will come with a small USB connectorif it is wireless. 
USB ports are located in different areas for every computer, but in general, laptops will have USB ports on the left or right side of the keyboard; most desktops will have a USB on the front or back of the modem or either side of the monitor.
  • Look for a small square port about the size of your USB connector.
  • Insert the USB connector. Flip the USB connector upside down if it does not fit the first time, but never forcethe USB connector in.
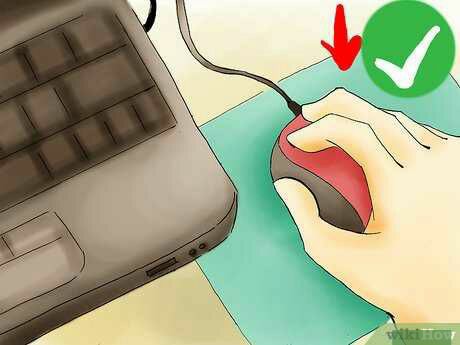
  1. Familiarize yourself with the mouse.[1]The front of the mouse points away from you and has two buttons on the left and right which you can click. These allow you to open programs and menus. In the middle of these two buttons isa small wheel, which allows you to scroll up and down pages.
  • You can use your index finger to click the left button and the middle finger to clickthe right one.
  • On the bottom of the mouse is a censor that allows the mouse to know where to move.


2. Place the mouse on a clean, smooth surface, preferably a mouse pad.[2]This allows the mouse to move without interference. You may have issues with the mouse if it is not on a mousepad, such as it not scrolling smoothly.


3. Grip the mouse lightly in your dominant hand.You don’twant to hang on to the mouse too tightly or click with a lot of force. Keep your fingers relaxed, and keep the mouse at elbow level. If your fingers become tired, take breaks from the computer.


4. Practice clicking with the mouse.The left button is the primary button for right-handedusers, and the right button is the primary button for left-handed users. Click theprimary button once to click on something and twice in a row to “double click” on a program or menu. When clicking the non-primary button, this is called “right-clicking.
  • Single-clicking often selects an item or opens a menu.
  • Double-clicking often opens items or folders.
  • Right-clicking usually displays a list of things you can do with a selected item.


5. Practice scrolling and dragging items with the mouse.Move the wheel with your pointer finger to scroll upand down pages. To drag an object, place the cursor on it, then press and hold down the primary button, and move the mouse to a new location. Release the primary button once you are done.

Saturday, 5 August 2017

TRANSLATE ANY LANGUAGE ON WHATSAPP


To translate any language on whatsapp create group and add this number +919043009480
For example type translate Hausa Learn any language 


 Look at the

For English to Hausa


For Hausa to English 


Should know that 
You may get an wrong translating when you are not writing Hausa correctly.
That's all 


For more info you can call this number 08065529451

COMPUTER SHORTCUT


GENERAL  SHORTCUT 
CTRL+C        (Copy)
CTRL+X         (Cut)
CTRL+V        (Paste)
CTRL+Z         (Undo)
DELETE         (Delete)

SHIFT+DELETE       (Delete the selected item permanently without placing the item in the Recycle Bin)CTRL while dragging an item (Copy the selected item)

CTRL+SHIFT        while dragging an item (Create a shortcut to the selected item)

F2 key      (Rename the selected item)

CTRL+RIGHT ARROW     (Move the insertion point to the beginning of the next word)

CTRL+LEFT ARROW     (Move the insertion point to the beginning of the previous word)

CTRL+DOWN ARROW    (Move the insertion point to the beginning of the next paragraph)

CTRL+UP ARROW    (Move the insertion point to the beginning of the previous paragraph)

CTRL+SHIFT with any of the arrow keys  (Highlight a block of text)

SHIFT with any of the arrow keys (Select more than one item in a window or on the desktop, or select text in a document)

CTRL+A   (Select all)

F3 key    (Search for a file or a folder)

ALT+ENTER   (View the properties for the selected item)

ALT+F4   (Close the active item, or quit the active program)

ALT+ENTER   (Display the properties of the selected object)

ALT+SPACEBAR   (Open the shortcut menu for the active window)

CTRL+F4 (Close the active document)

ALT+TAB   (Switch between the open items)

ALT+ESC   (Cycle through items in the order that they had been opened)

F6 key   (Cycle through the screen elements in a window or on the desktop)

F4 key (Display the Address bar list in My Computer or Windows Explorer)

SHIFT+F10   (Display the shortcut menu for the selected item)

ALT+SPACEBAR  (Display the System menu for the active window)

CTRL+ESC   (Display the Start menu)

ALT+Underlined letter in a menu name   (Display the corresponding menu)Underlined letter in a command name on an open menu (Perform the corresponding command)

F10 key   (Activate the menu bar in the active program)RIGHT ARROW (Open the next menu to the right, or open a submenu)

LEFT ARROW   (Open the next menu to the left, or close a submenu)

F5 key   (Update the active window)

BACKSPACE   (View the folder one level up in My Computer or Windows Explorer)

ESC   (Cancel the current task)

SHIFT when you insert a CD-ROM into the CD-ROM drive (Prevent the CD-ROM from automatically playing)

CTRL+SHIFT+ESC   (Open Task Manager).


Microsoft natural keyboard shortcuts


Windows Logo   (Display or hide the Start menu)

Windows Logo+BREAK   (Display the System Properties dialog box)

Windows Logo+D   (Display the desktop)

Windows Logo+M  (Minimize all of the windows)

Windows Logo+SHIFT+M    (Restore the minimized windows)

Windows Logo+E    (Open My Computer)

Windows Logo+F    (Search for a file or a folder)

CTRL+Windows Logo+F   (Search for computers)

Windows Logo+F1   (Display Windows Help)

Windows Logo+ L   (Lock the keyboard)

Windows Logo+R   (Open the Run dialog box)

Windows Logo+U   (Open Utility Manager).


Accessibility keyboard shortcuts

Right SHIFT for eight seconds   (Switch FilterKeys either on or off)

Left ALT+left SHIFT+PRINT SCREEN   (Switch High Contrast either on or off)

Left ALT+left SHIFT+NUM LOCK. (Switch the MouseKeys either on or off)

SHIFT five times   (Switch the StickyKeys either on or off)

NUM LOCK for five seconds   (Switch the ToggleKeys either on or off)

Windows Logo +U   (Open Utility Manager)

Windows Explorer keyboard shortcutsEND   (Display the bottom of the active window)

HOME   (Display the top of the active window)

NUM LOCK+Asterisk sign (*)   (Display all of the subfolders that are under the selected folder)

NUM LOCK+Plus sign (+)   (Display the contents of the selected folder)

NUM LOCK+Minus sign (-)   (Collapse the selected folder)

LEFT ARROW   (Collapse the current selection if it is expanded, or select the parent folder)

RIGHT ARROW   (Display the current selection if it is collapsed, or select the first subfolder).


Friday, 4 August 2017

HOW TO USE LAPTOP AS EASY


FOLLOW THIS STEPS.


 STEP1


Setting Up Your Laptop if you are using the laptop in your home, find an outlet and plug the charger in. Laptop computers run on batteries that can deplete rapidly, especially if you're using your laptop intensively. Unless you're somewhere remote or foreign where you absolutely have to go without, it's better to leave your laptop plugged in.

 STEP 2


Place the bottom part of the laptop on the table/desk you are sitting in front of.
They're called "laptops" because they can go on your lap, but that doesn't mean that it's always the best or right place. Try to find a comfortable angle for your wrists and hands - this might mean moving the laptop around until you find the best position for you.


STEP 3


 Lift the lid to open up until the screen looks comfortable for you. Most laptops have some type of clasp or latch which allows the screen to open.
  • If the laptop won't open, don't try to force it! Look for a latch instead. You shouldn't have to force the screen open.
  • Do not pull back the lid too far.A 45 degree obtuse angle is the most the laptop should be open to. The lid or hinge mechanism may be damaged or broken if pulled back any further.

STEP 4


Find the power button and turn it on. On most laptops, the power button is located slightly behind the keyboard. The power button is usually marked with the universal symbol for 'power on', a circle with a line going halfway through it.


STEP 5


Wait for the laptop to boot up. Since laptops are designed for portability as well as computing power, your laptop may have specialized hardware that will cause it to take longer to boot up than a desktop or smart phone.

STEP 6


Use the laptop's pointing device. On most computers, this is a flat, touch-sensitive area called a trackpad which will allow you to use your finger as your mouse. Simply slide one finger on the trackpad area to move the cursor.

Here are the main functions of a touchpad and how to control them:


  • Clicking: When people say “click,” they mean “press and release the left mouse button.” Clicking has a variety of uses. You can click while in a document to move the insertion point, a little line that indicates where your next action will take place. For example, you might click in front of a word you already typed and then type another word to appear before it in a letter. Clicking is also used in various windows to select check boxes or radio buttons (also called option buttons) to turn features on or off, or to select objects such as a picture or table in your document. Double-clicking can also be used to open objects for editing or to quickly select whole words.
  • Right-clicking: If you click the right touchpad button, Windows displays a shortcut menu that is specific to the item you clicked. For example, if you right-click a picture, the menu that appears gives you options for working with the picture. If you right-click the Windows desktop, the menu that appears lets you choose commands that display a different view or change desktop properties.
  • Clicking and dragging: To click and drag, you press and continue to hold down the left mouse button and then move (drag) the mouse to another location. For instance, you can press the left touchpad button (keeping it held down) and drag your finger on a touchpad up, down, right, or left to highlight contents of your document.
  • Scrolling: Many touchpads and wireless mouse models have a way to scroll through a document or Web site on your screen. Just roll the wheel on a mouse down to move through pages going forward, or scroll up to move backward in your document. With a touchpad, there is often an area marked on the right or left where you can run your finger up or down to scroll through a document.

Thursday, 3 August 2017

HOW TO OPERATE COMPUTER


Materials Needed
  • - CPU
  • - keyboard
  • - monitor
  • - mouse
  • - speakers
  • - printer
  • - Operating System


Step 1
Prior to powering up the computer system, make sure that the power cord is firmly connected to the back panel of the CPU and is plugged into the wall socket.

Step 2
Check if the video cable is firmly screwed to the port of the video card with the other end connected to the back panel of the monitor.

Step 3
Make sure that both the keyboard and mouse pointing device are securely plugged to the back panel. Also, check if they are connected to the correct port by checking on the markings. Steps 1 to 3 are essentially easy to do because aside from the mouse and keyboard devices, other components can only be plugged into their proper ports preventing the novice user from interchanging them.

Step 4
When all connections are secure, start up the machine by pressing the power button normally located in the front panel of the CPU.

Step 5
Depending on the configuration of the machine, a username and password may be requested; otherwise, the Operating System may be loaded directly to display the desktop to the user.

Step 6
Other basic operations that can be done include adjusting monitor settings in Step 8. Installation and launching of software is outlined in Step 10. Navigation of the file system is detailed from Step 15.

Step 7
The proper way to shut down or turn off the computer system is by clicking on the 'Start' button and choosing the 'Turn Off Computer' option. This will display the options to 'Standby', 'Restart', or 'Turn Off' the machine.

Step 8
To adjust the monitor settings, right click on any blank portion of the desktop and select the 'Properties' option from the context menu

Step 9
On the 'Display Properties' window, select the 'Settings' tab to adjust the resolution of the screen. The 'Themes' tab will allow the loading of pre-designed Windows themes. The 'Desktop' tab provides the way for changing the color of the desktop as well as the displayed wallpaper. The 'Appearance' tab provides the various options of changing the behavior of the windows, icons, and other elements of the platform, while the 'Screen Saver' tab shows the option to allow the monitor to go on standby or display animation.

Step 10
To extend the functionality of any computer system, software is normally installed into the local hard drive. A software installer may be through some media like a CD or DVD or from being downloaded from the Internet.

Step 11
For CD or DVD installers, insert the installation disk in the CD or DVD drive of the machine. This will be automatically read and launched by the Operating System.

Step 12
When the installation process is initiated, a new window will normally be displayed to the user. Majority of newer installers provide either a default or an advanced installation procedure. In most cases, simply click on the default process to allow the installer to complete the entire process with minimum user intervention.

Step 13
Upon completion of the installation process, a user may be prompted to reboot the machine. Follow the guide in Step 7 to accomplish this task.

Step 14
To launch the software, simply click on the 'Start' Menu, choose 'All Programs' and select from the menu the program intended to be run. An alternative to this process is to check if a shortcut link is created on the Desktop. Clicking this icon will also launch the associated program.

Cheapest Glo Data Plans and Prices In Nigeria 2017


LATEST GLO DATA PLANS AND PRICES FOR 2017

30MB for N50 PlanWhile MTN gives you 30MB with N100
 Glo said you deserve more by offering 50MB for just N100.
To subscribe for this plan dial
*127*14#
OR
Text 14 to127

100MB for N100 PlanHow time flies. Few years ago, we used to get 100mb with N1000 but now it's all history.
This is because Globacom offers you 100MB for just N100.
To subscribe for this plan dial
*127*51#
OR,
Text 51 to 127

200MB for N200 PlanWhile the previous plans mentioned above valid for one day,
this one stretches up to 3 days.
To opt in for this plan dial
*127*56#
Or
Text 56 to 127

Glo Weekly Plans1.6GB for N500 PlanWith just N500 naira,
you get 1.6GB of data while both MTN and Airtel gives just 750mb at the same price.
The plan is actually valid for 10 days which is even more than one week as stated.
It is undoubtedly the best and cheapest weekly plan as of now.
To subscribe for this plan, dial
*127*57#
OR,
Text 57 to 127

Glo Monthly Data BundlesOh yea... I know you have been waiting for this one.
Monthly plans are the most popular plans used by so many people and Glo offers the cheapest monthly data plans as at the time of this review.
Below are the different monthly bundles from Globacom.

3.2GB for N1,000 PlanWhen Glo introduced this plan, i thought it was a mistake from their server but to my greatest surprise, it was actually real.
This plan beats all other monthly plans as other networks offers 1.5GB with N1000 while with Glo, you get 3.2GB for N1000. (1.7GB higher than what you’ll get elsewhere). It lasts you for one month. Isn't it awesome?
To subscribe for this data bundle dial
*127*53#
OR, T
ext 53 to 127

7.5 GB for N2,000 PlanHere we go again. How about getting 7.5GB with 2k? Don't you think it's a good value for money if you are like me that uses lots of data.To subscribe for this plan dial *777# and follow the prompts

HOW TO CHECK DATA BALANCE
To check your Glo Data Balance, dial*127*0# , or text INFO to 127 .

GLO TWIN BASH OFFER


GLO Twin Bash Offer goes like this:
If you recharge N200, you will get 200MB of data worth + N200 airtime to call or send sms to any network and N200 airtime to call 10 friends and family.

The subscriber will therefore get N1,200 value for a data recharge of N200 and the recharge is valid for 4 days.

Recharge with N500, you will get 500MB of data, N500 airtime to call or send sms to any network and N500 airtime to call 10 friends and family, which is valid for 10 days.

Recharge N1,000 and you will get 1GB of data plus N1,000 free airtime to call or send sms to any network and N1000 free airtime to call 10 friends and family, which is valid for 15 days.Recharge N2,000 and enjoy 2GB of data plus N2,000 airtime bonus to call or send sms to any network and another N2,000 free airtime to call 10 friends and family. The validity is 30 days.

How To Opt-in For Glo Twin Bash

==> Recharge using  *223*PIN# to get benefits of twin bash.

NEW MTN DATA PLANS, PRICE AND ACTIVATION CODE


MTN Activation Code
  
Daily Plans
50MB N100 24 Hrs
Text
104 to 131

150MB N200 24 Hrs
Text
113 to 131

Weekly Plans
150MB N300 7 Days
Text
102 to 131

Other MTN Data Plans Awaiting for  Review:

1GB + 500MB (bonus data) Monthly Plan N1,000 30 days
Text
106 to 131

2.5GB + 1GB (bonus data) Monthly Plan N2,000 30 days
Text
110 to 131


Alternatively, you can simply dial *131# to activate any of the data plans

AIRTEL 1.5GB FOR ₦500

AIRTEL 1.5GB FOR ₦500


FREE 750MB BONUS Data waiting for you & a chance to WIN N10Mill the AIRTEL RED HOT promo!Dial *418*2# to activate 750MB and getEXTRA 750MBfor N500/val 14days

Note
This MB is not for all AIRTEL SIM